8am - 8pm EST Monday - Friday
10am - 7pm EST Saturday
How to Install Cork Plank Flooring
Please read the General information section before installation.
Inspection:
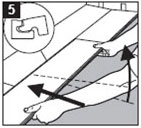
Prior to installation, inspect cork planks in daylight for visible faults/damage.
Check if subfloor/site conditions comply with the specifications described in these instructions.
If you are not satisfied do not install, and contact your supplier
Tools and materials required:
Electric saw.
Expansion gap spacers.
Pencil.
Set square.
PE film or 6 Mil Poly Vapor Barrier Sheeting.
Adhesive tape.
Moisture Protection:
Lay the PE film or 6 mil poly vapor barrier sheeting, allowing for at least 20 cm (8”) overlapping and tape.
Turn the film upward 5 cm (2”) along the walls.
Trim after the skirting boards are fixed.
Before laying:
Measure the room at right angle to the direction of the planks.
Planks in the final row should be at least 5 cm wide.
For this purpose, planks in the first row can be cut to smaller size.
Shuffle planks in order to obtain a pleasant blend of shades.
Lay planks preferably following the direction of the main source of light.
We recommend laying on wooden floors crossways to the existing floorboard.
Planks must not be nailed or screwed to the subfloor.
Skirting boards must not be fixed in a way which restricts the movement of the floor.
Expansion gaps:
Provide 10 mm (3/8”) expansion gaps to the walls and other fixed objects.
Areas greater than 100 m² (900 sq. ft) or 10 m (30 feet) in either direction, transitions between rooms and asymmetrical areas require extra expansion gaps
Start Install:
Start in the corner.
Turn the tongue side of the plank to the wall.
Maintain a gap of 10 mm (3/8”) on the short side.
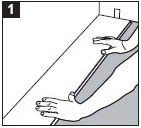
Hold the next cork floor plank at an angle against the first one and lay it flat on the floor.
Complete first row in the same way.
Cut final plank of the first row to correct length.
Start next row with the piece leftover (must be at least 300 mm (12’’) long)
Ensure that end joints are staggered at least 300 mm.
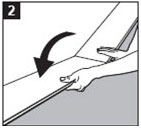
Place the first cork plank of the new row with the tongue side at an angle against the groove side of the plank in the previous row.
Press forward and lay it flat at the same time.
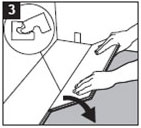
Place short end of the plank tiles at an angle against the previous installed plank and fold down.
Ensure that the plank is positioned on the integral locking strip of the plank in the previous row.
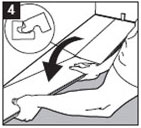
Lift planks (together with the previous laid in the same row) lightly up (about 30 mm (9/8’’)), push it against the row in front and then put it down.
Adjust the distance to the wall to 10mm (3/8’’) when three rows are completed.
Proceed installation as described above until reaching the opposite wall.