How to Install Jamboree Tiles
Jamboree Playground tiles and accessories are best installed over concrete or asphalt , but can also be laid over loose base surfaces like compact gravel or sand using a protective fabric and the QuadBlok system.
Please note: Dimensional tolerance is +/- 1/8” for thickness and width. It may be necessary to hand pick some tiles to ensure consistency in course line and color/tone uniformity.
Jamboree Playground tiles can be installed using a variety of installation methods. The most common and secure method is full adhesion of tiles and accessories to the substrates using a polyurethane adhesive.
For rooftop and specialty applications, Rubberflooringinc.com recommends the use of our fastening system called Quad Blok™. The tiles are adhered to the Quad Blok connector only, eliminating damage to the roof membrane.
Tools/Materials Required
- Two tape measures - one 25’, one 50’
- Chalk line
- Saber saw
- Blades for saber saw (7-10 teeth per inch, wood type)
- Utility knife with heavy-duty blades
- Framing square
- Silver or gold color paint pencils
- Standard size caulk gun
- 4” slot blade screwdriver
- Silicone Spray Lubricant
- Notched trowels (1/8” square notch - 2 minimum plus 1 for each additional 400 sq. ft.)
- Linoleum Knife (Foam Installation)
- Safety glasses
- 1-1/2” flexible putty knife
- Coveralls
- Kneepads
- Solvent safe rubber gloves, long cuff-style
- Rags
- Trash bags
- Push broom or high velocity blower
- Mineral spirits
- Installation instructions
- String line
- Cutting table (shipping pallet)
- Dustpan
Site Preparation
- Sweep area clear of all dust and loose debris.
- Determine a starting point for the first course of tile to best suit the site area. For irregular site configurations, the best starting point is often in the center. This will ensure a symmetrical finish for tiles that require trimming along the perimeter. Other installations are best started in the corner or along the edge that represents the length or width dimension of the site.
- Mark two points on the base surface at an equal distance from the edge of the installation. These points should be located near the opposite ends of the site in the lengthwise direction.
- Snap a chalk line through the established points. Note: when installing Jamboree Playground tiles over a geo-textile fabric, string lines must be used in place of chalk lines.
- Measure the length of the site along the chalk line. Mark a point at half the distance of the site.
- Using the 3-4-5 right triangle method (see below), snap a chalk line to form a 90° angle to the previously established length-wise chalk line. These perpendicular reference lines will serve as a guide for laying the first course of tile.
3-4-5 method explained:
- Measuring out two pieces of string or board other item that can be pulled straight and that measure 3 and 4 feet long.
- These will be the two "short" legs of your right triangle, so lay them down in as close to a right angle as you can get by just eyeballing them.
- Take a third piece of string or board or what have you, and measure it to 5 feet long.
- Make this last piece the "long" leg of the triangle. Once you get everything arranged neatly, if your legs are 3, 4, and 5 feet long, you'll have a right angle.
Quad Blok Installation
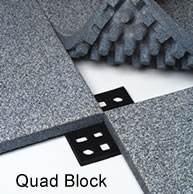
- Follow the Site Layout instructions to prepare the surface for the installation of 2-½” Jamboree Playground tiles
- Once chalk lines are established; place the first tile at the intersection of two chalk lines, aligning adjacent edges of the tile with the chalk lines.
- Apply a continuous 3/8” diameter bead of polyurethane adhesive along the center axes of all Quad Blok connectors. (Working adhesive time is dependent upon environmental conditions.)
- Fit the first tile with four prepared Quad Blok connectors by lifting each tile corner slightly, sliding the connectors under each corner and engaging the four corner legs of each tile with the respective apertures in the Quad Blok. Continue to sequentially lay the tile and to set the Quad Blok connectors along one chalk line until the first course of tile is complete.
NOTE: In the field, cut the Quad Blok connectors in half to properly secure tile around the perimeter edge of surface area. - Complete the other three quadrants of the area in a similar fashion.
- Depending on manpower availability, one or more quadrants can be worked on simultaneously using the above method.
- Allow 24 hours for adhesive to cure before opening area for use.
NOTE: Installation of Jamboree Playground tiles by means of the Quad Blok system works only with 2-½” tiles.
Fully Adhered Installation
- Follow the site layout instructions to prepare the site area for installation. The tiles, accessories and substrates must be dry before, during and 24 hours after the application of adhesive.
NOTE: Coverage rates for the polyurethane adhesive are approximately 60 sq/ft on concrete and 50 sq/ft on asphalt. - Using a 1/8“square-notched trowel, apply the E-Grip III adhesive slightly wider than the tile being placed.
- Place tile into the fresh adhesive bed following pre-established lines. If applicable, place ramps into the fresh adhesive in a similar manner.
- Allow 24 hours for adhesive to cure before opening area for use.
Cutting Tiles & Accessories
- Avoid leaving a cut edge of a tile exposed to eyesight. To ensure a finished appearance, any tile that has its factory molded edge removed or cut for any reason should be positioned against a transition ramp, masonry, or timber edging unless the edge is to be placed against a wall or other vertical member. Use either a silicone sealant or a permanently elastic urethane sealant/adhesive for filling gaps, if any, between cut edges and walls.
- The most accurate cuts are made using a heavy-duty utility knife and a straight edge. A saber saw utilizing a 7-10 TPI wood cutting blade also does an acceptable job, especially for free-form cuts. A saw with a 3-3.5 amp rated motor having a 1” stroke with variable orbital setting will produce the best results. Silicone spray lubricant will aide in the cutting and minimize heat from friction.